Taking photos is fun, but organizing them might not be as much fun. Here is a snapshot of my approach to ingesting and organizing photos.
Continue readingAuthor Archives: Jonathan
Running a reverse proxy to serve services on the Internet
I have the occasional need to make a local/self-hosted service be reachable on the world wide web. However, I do not want to host them on my cloud VMs for reasons such as:
- RAM: I am currently using the lowest-priced tier of VMs, which means that I get only 1 GB of RAM
- Storage: For the similar reason as RAM, my disk is 25 GB
- CPU: Having access to more than 1 core would be nice
Although the easy answer is to provision a bigger VM, I have a small Proxmox cluster that is more than capable of running VMs and (LXC) containers with access to more compute, RAM, and storage. Also, running them in separate instances is also great for separation.
While services like Tailscale Funnel or Cloudflare Tunnel exists, I wanted to roll my own as a learning exercise.
Continue readingOnsite Stack Ansible Playbook
I have just published an Ansible playbook to deploy a stack with Docker, PhotoPrism, Samba, Sanoid, and ZFS. This stack was deployed and used in January 2025.
https://codeberg.org/jonathanmtran/ais-onsite-stack
Background
For a retreat that took place in January 2025. I needed a server for the following functions:
- File share to
- store files (audio/video/slide decks/etc)
- be an ingest target for photos and videos
- Run a web-based photo viewer to facilitate
- selecting photos for printing
- curating photos for a (background) slideshow
For the requirement of a file share, the obvious choice was Samba since most of the clients are running Windows. There was also an Arch Linux client as well.
For a web-based photo viewer, we went with PhotoPrism. I wanted something that would simply import photos from a folder and display them. Immich may have worked as well, but here we are.
The data will reside on ZFS datasets. Sanoid will be configured to snapshot the datasets on a regular basis because things happen and we do not want to loose all of our data.
Development Process
Initially, the playbook was developed against an LXC container, but since we are planning to use ZFS, we switched the target host to a VM and kept iterating.
Deployment
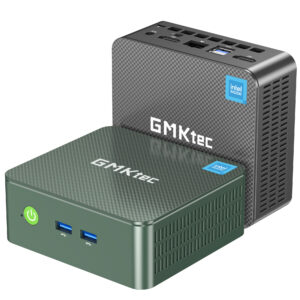
Towards the end of the year, GMKtec’s NucBox G3 Plus went on sale for $130, so I picked that up and ordered a 32GB SODIMM, a Samsung 990 PRO 1TB NVMe drive, and a Dogfish 1TB M.2 SATA SSD.
Once all of the bits were in my hands, I swapped the RAM, NVMe, and added the M.2 SATA SSD. Debian was then installed to the M.2 SATA SSD.
Now that the foundation was in place we:
- manually enabled the Debian Backports apt repository
- installed ZFS
- created the ZFS pool and datasets
- updated the (Ansible) inventory
- added our SSH key to the root user
- (and finally) executed the playbook against the NucBox G3 Plus
- (and really finally) ran
smbpasswd -ato create the user in Samba
The number of steps above was 4 too many. Since we were not able to script the creation of a ZFS pool in Ansible (yet), that had to be done manually before really executing the playbook. Additionally, smbpasswd requires us to enter a password to use. Again, it might have been possible to script but we were running out of time to deploy.
Conclusion
In the field, the stack worked pretty well. The only hiccup we experienced was that (because reasons), the ZFS pool did not mount on boot. When it did mount, it was not mounting under /mnt/tank. Thankfully we were able to address that and move on.
One future improvement to the playbook would be to script the creation of the ZFS pool and the datasets. Luckily we noted our zpool and zfs invocations in README.md so creating them on the physical host was pretty trivial.
It was nice to have a file share containing this year’s files. It was also a place for us to dump files that we needed last-minute. Additionally, we had a copy of files from previous years which was nice-to-have for when we needed to get something from the past.
Having an ingest target was very helpful as we were able to dump over 10 GB of photos and videos have a viewer we could hand off to someone for curation while we did other things like minor adjustments to photos and the actual printing of photos.
Should I get invited back to assist with this retreat again, I would have this as a part of my broader tech stack.
Create a metadata XMP sidecar file using exiftool
I recently added a video from my phone into Immich, but it did not have the (approximate) correct date and time. Because I am leveraging Immich’s external library functionality and the Docker container’s mount point is read-only, Immich is unable to create the XMP sidecar.
The following exiftool command creates an XMP sidecar file with the desired CreateDate property. The resulting file gets copied to the directory that is designated as the external library. Finally I ran the discover job such that Immich picks up the XMP sidecar.
$ exiftool -tagsfromfile 20241231224307.m4v -xmp:CreateDate="2024:12:31 22:43.07.00-08:00" 20241231224307.m4v.xmpAdding the VIQR input method to IBus
To add the VIQR input method to IBus, install the ibus-table-others package. My setup is GNOME on Arch Linux, so the steps were as follows:
- Install the package ibus-table-others package from the AUR
- Log out and log back in
- Add the Vietnamese (Viqr) input method in Keyboard settings
Background
When I need to type in Vietnamese, I use the VIQR input method because it was the method that made the most sense to me. The other popular method is VNI, but I did not have the patience to learn the numbers that would give me the desired accent (diacritic) marks.
I have the VIQR input method set up on my desktop but until recently, my laptop was not set up with the input method. To make it even more fun, I have swapped and reloaded laptops a few times of the past few years. Since this is something I have done years ago, it took a while to recall how to do this again.
Clonezilla: “Box” is an unknown partition device
I was looking for some files that were on my laptop before I erased it for re-partitioning (to GPT) and reinstalling. Luckily, I made an image of the drive using Clonezilla.
When trying to restore the partition image to a disk (restoreparts) inside a VM, Clonezilla kept error-ing out after selecting the partition(s) to restore.
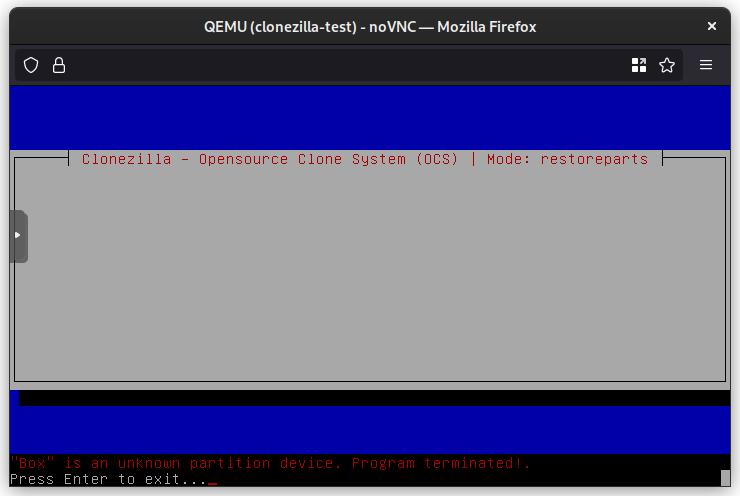
After some failures in both Proxmox and ESXi, it dawned on me that Clonezilla is unhappy because there are no partitions to target. Luckily, one can drop to the shell, sudo su to become root, and use fdisk to create the target partition(s).
If unsure about the partition type and/or size, there are a few files in the folder containing the image that could provide hints such as sda-pt.parted (sda is the block device at the time the image was created).
Once the partition(s) are created, CTRL+C twice to exit root and exit the shell and restart Clonezilla to restore partition image(s).
Updating ESXi host using local patch zip file
A Tweet from @ESXiPatches prompted me to update my ESXi 6.7.0 host. I enabled SSH and tried to update, but I got the popular message:
$ esxcli software profile update -p ESXi-6.7.0-20220704001-standard \
  -d https://hostupdate.vmware.com/software/VUM/PRODUCTION/main/vmw-depot-index.xml
 [OSError]
 [Errno 28] No space left on device
 Please refer to the log file for more details.
This is not the first time I’ve been hit by this error. Last time I worked around it I did not document it. I do know that I tried the solution from virten.net and it did not work.
I came across another solution where instead of specifying the depot URL, esxcli can be pointed at an archive. I downloaded the patch zip file from VMware Customer Connect, uploaded it to my datastore (datastore-0), and was able to update my host with the following command:
$ esxcli software profile update -p ESXi-6.7.0-20220704001-standard -d /vmfs/volumes/datastore-0/_downloads/ESXi670-202207001.zip
Update Result
   Message: The update completed successfully, but the system needs to be rebooted for the changes to be effective.
   Reboot Required: true
   <snip>
Proxmox VE and Let’s Encrypt with DNS-01 Validation
One of the appealing reasons for using Proxmox VE as your hypervisor is that one can configure their system to obtain a TLS certificate for https from Let’s Encrypt on a regular basis.
The Environment
At the time of writing, I am running Proxmox VE version 7.2-4. The name of the node for this article will be pve.
I have a dynamic DNS zone (i.e. acme.example.net) running BIND for the purposes of enabling ACME clients (acme.sh) to update the dynamic zone with the appropriate TXT record. A CNAME will be created in the “top-level” zone (example.net) such that querying _acme-challenge.pve.example.net will be answered by _acme-challenge.pve.acme.example.net.
Configuration
In PVE, go to Datacenter > ACME and then click Add under Accounts to register an ACME account.
The next step is to add a Challenge Plugin. On the same screen click Add under Challenge Plugins.
Plugin ID: nsupdate
Validation Delay: 30 (default)
DNS API: nsupdate (RFC 2136)
NSUPDATE_KEY=/var/lib/pve/nsupdate.key
NSUPDATE_SERVER=acme.ns.example.net
Since I am using nsupdate as the DNS API, I generate a key locally:
$ ddns-confgen -a hmac-sha256 -k pve.example.net. -q > pve.key
Transfer the key to PVE to the location specified in NSUPDATE_KEY. Below are the user/group and permissions for reference.
# ls -l /var/lib/pve/nsupdate.key
-rw-r--r-- 1 root root 128 Jun 21 19:43 /var/lib/pve/nsupdate.key
Now go to the node itself under Datacenter. Go to System > Certificates. Under ACME, click Add.
Select DNS as the Challenge Type, select nsupdate as the plugin, and enter the PVE host’s domain.
Since we have delegated the actual records to another DNS zone, we need to make one small change to the (PVE) node’s configuration. Under the DNS Validation through CNAME Alias of the documentation:
set the
https://pve.proxmox.com/wiki/Certificate_Management#sysadmin_certs_acme_dns_challengealiasproperty in the Proxmox VE node configuration file
To do that, I ssh-ed into the node (as root), opened /etc/pve/local/config in nano, and added alias=pve.acme.example.net to the end of the line that has the domain (in my case, it was the line that started with acmedomain0)
# cat /etc/pve/local/config
acme: account=default
acmedomain0: pve.example.net,plugin=nsupdate,alias=pve.acme.example.net
Save (CTRL+O) and Exit (CTRL+X)
Back in the web interface, in the Certificates screen (Datacenter > Your node (pve) > System > Certificates) you should be able to select the domain and click Order Certificates Now.
At this point PVE should be able to create a TXT _acme-challenge record in the (delegated) dynamic DNS zone, Let’s Encrypt should be able to validate it, and we should be able to get an TLS certificate for https.
can’t change attributes MNT_DEFEXPORTED already set for mount
When restarting my TrueNAS (CORE) box, I got a few of the following errors for a few of my datasets:
Apr 23 02:11:37 truenas 1 2022-04-23T02:11:37.549270+00:00 truenas.local mountd 1176 - - can't change attributes for /mnt/tank/user/jmtran: MNT_DEFEXPORTED already set for mount 0xfffff8016cc87000
Apr 23 02:11:37 truenas 1 2022-04-23T02:11:37.549276+00:00 truenas.local mountd 1176 - - bad exports list line '/mnt/tank/user/jmtran'
They were not show-stoppers, but they were slightly annoying. Since exports is a NFS thing, let’s take a look at the sharenfs property
$ zfs get -t filesystem sharenfs
NAME                                                   PROPERTY  VALUE     SOURCE
...
tank/user/jmtran                                       sharenfs  on        local
The source of the sharenfs property for some datasets were either local or received. This was because tank was from a Linux system and I had manually set sharenfs to share the dataset via NFS.
To made TrueNAS happy, I did the following such that the source of the property became default
# zfs inherit sharenfs tank/user/jmtran
# zfs get -t filesystem sharenfs tank/user/jmtran
NAME              PROPERTY  VALUE     SOURCE
tank/user/jmtran  sharenfs  off       default
Additional Show Notes for LINUX Unplugged 377
Episode link: https://linuxunplugged.com/377
During the discussion regarding youtube-dl, pagure was brought up as another self-hosted GitHub-like service. After a few failed DuckDuckGo searches, I found the project on awesome-selfhosted.
https://pagure.io/pagure